
Data Management & Integration
Week 4 — Lesson 3 | CI2000: Computer Fundamentals
Learning Objectives
- Import data from external sources into Excel and export Excel data to Word, selecting the method (copy-paste, embed, or link) appropriate to the document's update requirements (CO-7)
- Embed an Excel chart or table in a Word report so that the final document presents both narrative analysis and supporting data professionally (CO-7)
- Apply data validation rules to restrict data entry in a healthcare spreadsheet, preventing common errors such as invalid dates, out-of-range values, or incorrect categories (CO-6)
- Analyze the differences between embedded and linked objects, explaining when each method is appropriate for healthcare reporting workflows (CO-7)
Part 1 of 5 — Copy, Paste Special, Embed, and Link: Understanding Your Options
In a healthcare work environment, you rarely use just one application. A monthly performance report written in Word needs charts and tables from Excel. A patient communication letter created in Word pulls addresses from an Excel mailing list. Understanding how Microsoft Office applications share data is an essential skill for healthcare professionals who create reports, correspondence, and documentation that combine narrative text with numerical data.
Standard Copy and Paste
The simplest way to move data between applications is Copy and Paste (Ctrl+C, Ctrl+V). When you copy a table or chart from Excel and paste it into Word, Word creates a static copy. The pasted object looks exactly like the original at the moment of pasting, but it has no connection to the source Excel file. If you later update the numbers in Excel, the Word document will not reflect those changes. Standard paste is appropriate when the data is final and will not change.
Paste Special: More Control
Paste Special (Ctrl+Alt+V) provides additional options for how the pasted content appears and behaves:
Formatted Text (RTF) – Pastes the data as a formatted Word table. You can edit the table directly in Word using Word's table tools. Good for small data sets that you want to customize within the document.
Unformatted Text – Strips all formatting and pastes raw text. Useful when you want to reformat the data using Word styles.
Picture (Enhanced Metafile) – Pastes an image of the Excel data. The data cannot be edited in Word, but the image preserves the exact appearance of the original. Good for presentations and formal reports.
Microsoft Excel Worksheet Object (Embed) – Embeds the Excel data inside the Word document, allowing double-click editing using Excel tools within Word. The embedded object is an independent copy with no connection to the source file.
Paste Link – Creates a live connection to the original Excel file. When the source data changes, the Word document updates automatically. Requires the source file to remain accessible at its saved location.
Embedding vs. Linking: The Critical Difference
Embedding places a copy of the Excel object inside the Word document. The embedded object can be edited by double-clicking it (which opens Excel's interface within Word), but it is not connected to the original Excel file. Changes to the original file do not affect the embedded copy, and changes to the embedded copy do not affect the original file. Embedding increases the Word file size because the full Excel data is stored inside it.
Linking inserts a reference to the original Excel file. The Word document displays the current data from the Excel source and updates automatically (or on demand) when the source changes. The Word file size stays smaller because it stores only the reference, not the full data. However, linking requires that the original Excel file remains accessible at its saved location. If the Excel file is moved, renamed, or deleted, the link breaks.
Healthcare Connection: A clinic's quality improvement coordinator creates a monthly performance report in Word that includes a table of patient satisfaction scores and a bar chart of wait times, both maintained in Excel. For the chart, they use linking because the data updates weekly and the report should always show the latest figures. For a table of last quarter's final statistics, they use embedding because those numbers are fixed and will not change. Understanding when to embed versus link prevents outdated data from appearing in official healthcare reports.
| Method | How It Works | Editable in Word? | Updates When Source Changes? | Best Healthcare Use Case |
|---|---|---|---|---|
| Standard Paste (Ctrl+V) | Creates a static Word table from copied Excel data | Yes (as a Word table) | No | Pasting finalized patient data into a one-time report |
| Paste as Picture | Pastes an image of the Excel selection | No (image only) | No | Including a formatted Excel chart in a PDF report for distribution |
| Paste as Formatted Text | Pastes data as a formatted Word table preserving some styling | Yes (as a Word table) | No | Inserting a small data summary into a memo with Word formatting control |
| Embed (Worksheet Object) | Places an editable Excel object inside the Word document | Yes (double-click opens Excel tools) | No (independent copy) | Embedding a budget worksheet in a department proposal |
| Link (Paste Link) | Creates a live reference to the original Excel file | Limited (must edit in source file) | Yes (auto or manual update) | Linking a monthly patient volume chart that updates as new data is entered |
Part 2 of 5 — Embedding Excel Tables and Linking Charts in Word
Now that you understand the conceptual differences between embedding and linking, let's walk through the practical steps for each method. According to Microsoft's official documentation, these procedures work consistently across Word and Excel in Microsoft 365.
Embedding an Excel Table in Word
- Open your Excel workbook and select the cells you want to embed (e.g., a patient visit summary table).
- Copy the selection (Ctrl+C).
- Switch to your Word document and position the cursor where you want the table.
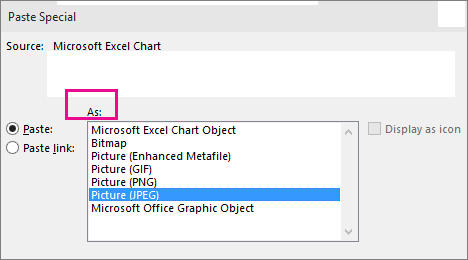
- Go to Home > Paste > Paste Special (or press Ctrl+Alt+V).
- In the Paste Special dialog, select Microsoft Excel Worksheet Object.
- Ensure Paste (not Paste Link) is selected on the left side.
- Select OK.
The Excel table appears in your Word document. To edit it, double-click the embedded object. Word's interface temporarily transforms to show Excel's Ribbon, formula bar, and cells, allowing you to make changes using full Excel functionality. Click outside the object to return to Word's normal editing mode.
Linking an Excel Chart in Word
- Open your Excel workbook and select the chart you want to link.
- Copy the chart (Ctrl+C).
- Switch to your Word document and position the cursor.
- Go to Home > Paste > Paste Special (Ctrl+Alt+V).
- In the Paste Special dialog, select Microsoft Excel Chart Object.
- Select Paste Link on the left side.
- Select OK.
The chart appears in Word and is connected to the Excel source. When you update the data in Excel, the chart in Word reflects the changes. To manually update a linked chart, right-click it and choose Update Link. To set automatic updates, go to File > Info > Edit Links to Files and configure update settings.
Inserting an Excel Table Directly from Word
- In Word, go to Insert > Table > Excel Spreadsheet.
- An embedded Excel grid appears in the Word document with the Excel Ribbon active.
- Enter data and create formulas as you would in Excel.
- Click outside the grid to return to Word.
This method is useful when you need a small calculation table within a document and do not have a separate Excel file. For example, you might add a quick summary table to a healthcare memo that calculates totals using SUM formulas.
Managing Linked Objects — Best Practices
- Keep source files in a stable location – Do not move or rename the Excel file after linking. If you must move it, update the link path in Word via File > Info > Edit Links to Files.
- Update links before printing or sharing – Right-click linked objects and choose Update Link to ensure the latest data is displayed.
- Break links for final distribution – If you are sending the Word document to someone who does not have access to the Excel source, break the link (Edit Links to Files > Break Link) to convert the linked object to a static image. This prevents broken link errors for the recipient.
Healthcare Connection: A department head prepares a quarterly staffing report in Word. They link a bar chart showing patient volume trends from an Excel workbook that is updated weekly by the front desk. Each time the department head opens the Word report, the chart automatically reflects the latest patient volume data. Before submitting the final report to hospital administration, they update all links, review the charts, and then break the links so the report is self-contained and can be distributed as a PDF without requiring access to the source Excel file.
Part 3 of 5 — Exporting Data: CSV and Other Formats
Healthcare organizations frequently need to move data out of Excel into other systems, or bring data into Excel from external sources. The most common interchange format is CSV (Comma-Separated Values), a plain text format that nearly every software system can read. Understanding how to import and export CSV files is a practical skill for healthcare data management.
What Is a CSV File?
A CSV file stores tabular data as plain text. Each row of data is a line of text, and each column value within a row is separated by a comma. For example, a patient record might look like this in CSV format:
Smith,John,1985-03-15,M,Cardiology
CSV files have the extension .csv and can be opened by Excel, Google Sheets, database applications, EHR systems, and text editors. Because CSV is a universal format, it serves as a bridge between systems that do not share a native file format.
Exporting Excel Data to CSV
According to Microsoft's documentation, exporting to CSV is straightforward:
- Open your Excel workbook and select the worksheet you want to export.
- Go to File > Save As (or Export).
- In the Save as type drop-down, select CSV (Comma delimited) (*.csv).
- Choose a file name and location, then select Save.
- Excel may warn you that some features are not compatible with the CSV format. Select Yes to proceed.
Important CSV Limitations:
- No formatting – CSV files do not preserve fonts, colors, borders, or cell styles. Only the raw data values are saved.
- No formulas – Formulas are converted to their calculated values. The formula =SUM(A1:A10) is saved as the resulting number.
- Single sheet only – CSV can only store one worksheet. If your workbook has multiple sheets, you must save each one separately.
- No charts or images – Visual elements are not included in CSV exports.
Importing CSV Data into Excel
To bring external data into Excel:
- Go to File > Open and change the file type filter to Text Files (*.csv, *.txt).
- Navigate to the CSV file and select Open.
- Excel opens the file and automatically parses the comma-separated values into columns.
For more control over the import process, use Data > From Text/CSV. This launches the import wizard, where you can specify the delimiter (comma, tab, semicolon), text qualifier, and data types for each column.
Healthcare Data Exchange Scenarios
CSV files are commonly used in healthcare for:
Patient Lists
Importing patient lists from a practice management system into Excel for analysis
Billing Data
Exporting billing data from Excel to upload into an insurance claims system
Staff Schedules
Transferring staff schedules from Excel into a scheduling application
Lab Results
Receiving lab results from a laboratory information system in CSV for review and tracking
Healthcare Connection: A clinic receives a monthly CSV file from their laboratory partner containing patient test results. The office manager opens the CSV in Excel, applies formatting (headers, number formats, conditional formatting for abnormal values), performs analysis using SUM, AVERAGE, and IF functions, and then saves the file as an Excel workbook (.xlsx) for internal use. The CSV serves as the bridge between the lab's information system and the clinic's Excel-based tracking system.
Part 4 of 5 — Data Validation for Healthcare Accuracy
In healthcare, data accuracy is not just about convenience — it directly impacts patient safety, billing accuracy, and regulatory compliance. Data validation in Excel creates rules that restrict what data can be entered into cells, catching errors before they become part of your dataset. According to Microsoft's documentation, data validation is accessed from the Data tab and provides multiple validation types, input messages, and error alerts.
Step-by-Step: Creating a Data Validation Drop-Down List
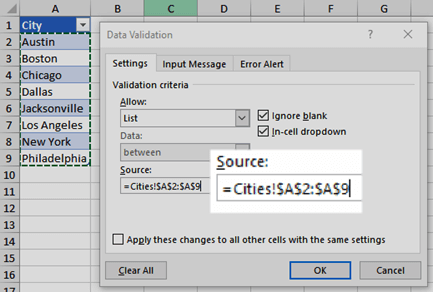
One of the most common and useful data validation techniques is creating a drop-down list that limits entries to a predefined set of options. Here is how to create a drop-down list for a patient intake form's "Visit Type" column:
- Select the cells where you want the drop-down to appear (e.g., column C, rows 2 through 100).
- Go to Data > Data Validation.
- In the Settings tab, set Allow to List.
- In the Source field, type the allowed values separated by commas: New Patient,Follow-Up,Routine,Urgent,Annual Physical
- Select the Input Message tab. Check Show input message when cell is selected. Enter a title like "Visit Type" and a message like "Select the type of visit from the drop-down list."
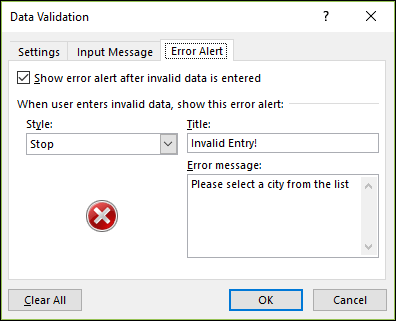
- Select the Error Alert tab. Set the style to Stop, enter a title like "Invalid Entry" and a message like "Please select a visit type from the drop-down list."
- Select OK.
Now, when a user clicks a cell in the Visit Type column, a drop-down arrow appears with the five predefined options. If someone tries to type a value that is not on the list, the error alert blocks the entry and displays your custom message.
Numeric Validation for Clinical Values
For columns containing clinical measurements, numeric validation prevents impossible or implausible values:
- Systolic Blood Pressure – Allow: Whole number, Between 50 and 300. Input message: "Enter systolic BP in mmHg (typically 70-200)."
- Heart Rate – Allow: Whole number, Between 30 and 250. This prevents accidental entries like 1500 (a misplaced digit) or negative numbers.
- Body Temperature – Allow: Decimal, Between 90.0 and 110.0 (Fahrenheit). Input message: "Enter temperature in degrees Fahrenheit."
- Patient Age – Allow: Whole number, Between 0 and 130.
Date Validation
Date validation ensures that date entries fall within an expected range:
- Appointment Date – Allow: Date, Greater than or equal to today. This prevents scheduling appointments in the past.
- Date of Birth – Allow: Date, Between 1/1/1900 and today. This prevents impossible future birth dates.
Text Length Validation
For fields with character limits, text length validation is useful:
- Insurance ID Number – Allow: Text length, Equal to 11 characters. This enforces a consistent ID format.
- Notes Field – Allow: Text length, Less than or equal to 500 characters. This keeps notes concise in a shared spreadsheet.
Data Integrity Best Practices
Data validation is one component of a broader data integrity strategy. In healthcare, maintaining data integrity means:
- Consistent data entry – Use drop-down lists and validation rules to prevent variations like "ER" vs. "Emergency" vs. "Emergency Room."
- Required fields – While Excel's data validation cannot force a user to fill in a cell, you can use conditional formatting to highlight blank required fields in red as a visual reminder.
- Audit trails – Track who made changes by using the Comments feature or maintaining a change log on a separate sheet.
- Regular validation checks – Periodically sort and filter your data to check for inconsistencies, outliers, or blank cells that should have values.
- Backup copies – Save dated backup copies of important spreadsheets (e.g., Patient_Vitals_Feb2026_Backup.xlsx).
Healthcare Connection: A front desk coordinator creates a patient intake spreadsheet with data validation on every critical column: a drop-down list for visit type, whole number validation on blood pressure and heart rate fields, date validation on appointment dates that prevents past dates, and text length validation on insurance ID numbers. When a new employee starts entering data, the input messages guide them on what to enter, and the error alerts catch mistakes immediately. This validation layer is the first line of defense against data entry errors that could cascade into billing mistakes, scheduling conflicts, or clinical misunderstandings.
| Validation Type | Allow Setting | Criteria Example | Healthcare Use Case |
|---|---|---|---|
| Drop-Down List | List | New Patient, Follow-Up, Routine, Urgent, Annual Physical | Visit type column in a patient intake log |
| Whole Number Range | Whole number, Between | 50 to 300 | Systolic blood pressure readings (prevents impossible values) |
| Decimal Range | Decimal, Between | 90.0 to 110.0 | Body temperature in Fahrenheit (catches mistyped entries) |
| Date Range | Date, Greater than or equal to | Today's date | Appointment scheduling (prevents booking in the past) |
| Text Length | Text length, Equal to | 11 characters | Insurance ID number (enforces consistent format) |
| Custom Formula | Custom | =ISNUMBER(SEARCH("@",A2)) |
Email address column (checks for @ symbol presence) |
Part 5 of 5 — Creating Healthcare Reports and Mail Merge Basics
The ultimate goal of Office integration is to create professional, comprehensive healthcare reports that combine the narrative strengths of Word with the data analysis power of Excel. Additionally, mail merge enables healthcare organizations to send personalized communications to patients, staff, and stakeholders using data stored in Excel spreadsheets.
Building a Combined Healthcare Report
Consider this real-world scenario: a clinic manager needs to produce a quarterly patient services report for the medical director. The report includes narrative analysis (written in Word), patient volume data (maintained in Excel), a chart of wait time trends (created in Excel), and a summary statistics table (also from Excel). Here is a workflow for building this report:
- Prepare the Excel data – Ensure all data tables and charts are finalized. Name key ranges for easy reference. Create any summary calculations needed (totals, averages, comparisons to prior quarters).
- Create the Word document – Set up the report structure with headings, page numbers, and your organization's branding. Write the narrative sections that analyze the data, identify trends, and recommend actions.
- Insert the data – Link the wait time chart (it may still receive weekly updates before the report is finalized). Embed the summary statistics table (the quarter's numbers are final and will not change).
- Add context around each data element – Write a paragraph before each chart or table that explains what the reader should look for, and a paragraph after that interprets the findings and proposes actions.
- Finalize – Update all links, verify that charts reflect the latest data, break links for final distribution, and save the document as PDF for the medical director.
Mail Merge: Personalized Patient Communications
According to Microsoft's documentation, mail merge lets you create a batch of personalized documents — such as letters, labels, or envelopes — using a template document in Word and a data source in Excel. Each document is personalized with information from a specific row in the Excel spreadsheet.
Healthcare applications of mail merge include:
- Patient appointment reminders – A template letter that inserts each patient's name, appointment date, time, and provider name.
- Lab result notifications – Personalized letters informing patients that their lab results are ready, with the patient's name and ordering physician.
- Annual wellness reminders – Letters to patients who are due for annual checkups, physicals, or screenings.
- Staff communications – Personalized memos to employees about schedule changes, training requirements, or benefit enrollment.
Mail Merge Steps (Overview)
Create the data source in Excel – Set up a spreadsheet with column headers for each piece of variable information (First Name, Last Name, Address, Appointment Date, Provider, etc.). Each row represents one recipient.
Create the template in Word – Write the letter with placeholder text where personalized information will be inserted. Include your organization's letterhead and standard greeting/closing text.
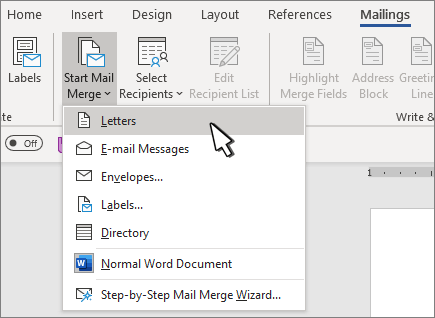
Start the Mail Merge Wizard – In Word, go to Mailings > Start Mail Merge > Step-by-Step Mail Merge Wizard. Select recipients by choosing Use an existing list and browse to your Excel file. Select the correct worksheet.
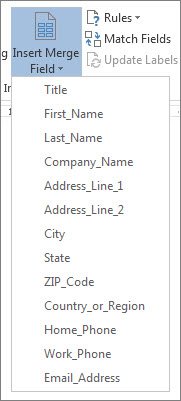
Insert merge fields – Place the cursor where you want personalized data and select Insert Merge Field. Select the appropriate column name (e.g., «First_Name», «Appointment_Date»). Select Preview Results to see how the merged documents will look.
Complete the merge – Choose to Edit Individual Documents (creates a new Word document with all merged letters), Print Documents (sends directly to the printer), or Send Email Messages (if sending electronically).
Data Integrity for Mail Merge: Mail merge quality depends entirely on the quality of your Excel data. Before running a merge: ensure no blank rows in the middle of your data, verify that column headers are descriptive and do not contain special characters, use data validation to ensure consistent formatting, and sort and filter the data source to target specific recipients.
Healthcare Connection: A medical office sends appointment reminder letters to 200 patients each week. The office manager maintains an Excel spreadsheet with patient names, addresses, appointment dates, times, and provider names. Using Word's mail merge, a single template letter generates 200 personalized reminders in minutes. Each letter addresses the patient by name, includes their specific appointment details, and is ready to print and mail. Without mail merge, creating 200 individual letters would take hours; with it, the process takes under 10 minutes.
Transfer Method Challenge
For each healthcare integration scenario below, decide the best data transfer method: Paste (static copy), Embed (self-contained, editable), or Link (live connection to source).
Scenario 1: A monthly patient volume chart in a board report that must always show the most current data when the report is opened.
Correct! Link creates a live connection to the source Excel file. When the spreadsheet updates, the chart in the Word report updates automatically — always current for board meetings.
Not quite. Paste creates a static copy that won't update. The correct method is Link — a linked object maintains a live connection to the source, ensuring the chart always shows current data.
Not quite. Embedding creates an independent copy. The correct method is Link — only a linked object updates automatically when the source Excel data changes.
Scenario 2: A one-time cost comparison table to include in an email to the office manager. The data will not change after sending.
Correct! Paste creates a static copy. Since this is a one-time snapshot that won't change, a simple paste keeps the file small and self-contained.
Not quite. Embedding adds unnecessary file size for static data. The correct method is Paste — for static, one-time data that won't change, Paste is simplest and most efficient.
Not quite. Linking requires the recipient to have access to the source Excel file. The correct method is Paste — static data doesn't need a live connection.
Scenario 3: A training presentation with budget data that will be presented at multiple off-site locations without internet access.
Correct! Embed includes a full copy of the Excel data inside the file. It can be edited on-site without needing the original file or network connection.
Not quite. Paste makes the data non-editable as Excel. The correct method is Embed — embedded objects carry the full source data inside the destination file, editable anywhere without network access.
Not quite. Linking requires access to the source file, which won't be available off-site. The correct method is Embed.
▶ How to add branded templates to Word, Excel & PowerPoint start pages • Kevin Stratvert
Knowledge Checks
Lesson 4.3 Summary
- Standard Paste creates a static copy; Paste Special offers formatting control, embedding, and linking options.
- Embedded objects are independent copies editable via double-click; linked objects maintain live connections to the source Excel file.
- CSV is the universal interchange format for moving data between Excel and external healthcare systems.
- Data validation prevents entry errors at the source — use drop-down lists, numeric ranges, date restrictions, and text length rules.
- Mail merge combines a Word template with Excel data to generate personalized patient communications in bulk.
- Always break links before distributing final reports to ensure recipients see the intended data without broken references.